Event Notification
An event is essentially a significant or meaningful change in the state of both virtual and physical resources associated with a cloud environment. Events are used by monitoring systems, usage and billing systems, or any other event-driven workflow systems to discern a pattern and make the right business decision. In CloudStack an event could be a state change of virtual or physical resources, an action performed by an user (action events), or policy based events (alerts).
Event Logs
There are two types of events logged in the CloudStack Event Log. Standard events log the success or failure of an event and can be used to identify jobs or processes that have failed. There are also long running job events. Events for asynchronous jobs log when a job is scheduled, when it starts, and when it completes. Other long running synchronous jobs log when a job starts, and when it completes. Long running synchronous and asynchronous event logs can be used to gain more information on the status of a pending job or can be used to identify a job that is hanging or has not started. The following sections provide more information on these events..
Notification
Event notification framework provides a means for the Management Server components to publish and subscribe to CloudStack events. Event notification is achieved by implementing the concept of event bus abstraction in the Management Server.
A new event for state change, resource state change, is introduced as part of Event notification framework. Every resource, such as user Instance, volume, NIC, network, public IP, Snapshot, and Template, is associated with a state machine and generates events as part of the state change. That implies that a change in the state of a resource results in a state change event, and the event is published in the corresponding state machine on the event bus. All the CloudStack events (alerts, action events, usage events) and the additional category of resource state change events, are published on to the events bus.
Note
Alerts for some more important events will be sent multiple times. This is due to the nature of guarding certain resources from multiple threads in the code, to make sure that events are not missed. Examples are “Host down” or “HA starting VM”. These are considered too important to not send immediately and hence a check if they are already queued can not be done.
Implementations
An event bus is introduced in the Management Server that allows the CloudStack components and extension plug-ins to subscribe to the events by using the Advanced Message Queuing Protocol (AMQP) client. In CloudStack, a default implementation of event bus is provided as a plug-in that uses the RabbitMQ AMQP client. The AMQP client pushes the published events to a compatible AMQP server. Therefore all the CloudStack events are published to an exchange in the AMQP server.
Additionally, both an in-memory implementation and an Apache Kafka implementation are also available.
Note
On upgrading from 4.19.x or lower, existing AMQP or Kafka integration
configurations should be moved from folder
/etc/cloudstack/management/META-INF/cloudstack/core to
/etc/cloudstack/management/META-INF/cloudstack/event
Use Cases
The following are some of the use cases:
Usage or Billing Engines: A third-party cloud usage solution can implement a plug-in that can connects to CloudStack to subscribe to CloudStack events and generate usage data. The usage data is consumed by their usage software.
AMQP plug-in can place all the events on the a message queue, then a AMQP message broker can provide topic-based notification to the subscribers.
Publish and Subscribe notification service can be implemented as a pluggable service in CloudStack that can provide rich set of APIs for event notification, such as topics-based subscription and notification. Additionally, the pluggable service can deal with multi-tenancy, authentication, and authorization issues.
AMQP Configuration
As a CloudStack administrator, perform the following one-time configuration to enable event notification framework. At run time no changes can control the behaviour.
Create the folder
/etc/cloudstack/management/META-INF/cloudstack/eventInside that folder, open
spring-event-bus-context.xml.Define a bean named
eventNotificationBusas follows:name : Specify a name for the bean.
server : The name or the IP address of the RabbitMQ AMQP server.
port : The port on which RabbitMQ server is running.
username : The username associated with the Account to access the RabbitMQ server.
password : The password associated with the username of the Account to access the RabbitMQ server.
exchange : The exchange name on the RabbitMQ server where CloudStack events are published.
A sample bean is given below:
<beans xmlns="http://www.springframework.org/schema/beans"
xmlns:xsi="http://www.w3.org/2001/XMLSchema-instance"
xmlns:context="http://www.springframework.org/schema/context"
xmlns:aop="http://www.springframework.org/schema/aop"
xsi:schemaLocation="http://www.springframework.org/schema/beans
http://www.springframework.org/schema/beans/spring-beans-3.0.xsd
http://www.springframework.org/schema/aop http://www.springframework.org/schema/aop/spring-aop-3.0.xsd
http://www.springframework.org/schema/context
http://www.springframework.org/schema/context/spring-context-3.0.xsd">
   <bean id="eventNotificationBus" class="org.apache.cloudstack.mom.rabbitmq.RabbitMQEventBus">
      <property name="name" value="eventNotificationBus"/>
      <property name="server" value="127.0.0.1"/>
      <property name="port" value="5672"/>
      <property name="username" value="guest"/>
      <property name="password" value="guest"/>
      <property name="exchange" value="cloudstack-events"/>
   </bean>
</beans>
The
eventNotificationBusbean represents theorg.apache.cloudstack.mom.rabbitmq.RabbitMQEventBusclass.If you want to use encrypted values for the username and password, you have to include a bean to pass those as variables from a credentials file.
A sample is given below
<beans xmlns="http://www.springframework.org/schema/beans"
       xmlns:xsi="http://www.w3.org/2001/XMLSchema-instance"
       xmlns:context="http://www.springframework.org/schema/context"
       xmlns:aop="http://www.springframework.org/schema/aop"
       xsi:schemaLocation="http://www.springframework.org/schema/beans
        http://www.springframework.org/schema/beans/spring-beans-3.0.xsd
        http://www.springframework.org/schema/aop http://www.springframework.org/schema/aop/spring-aop-3.0.xsd
        http://www.springframework.org/schema/context
        http://www.springframework.org/schema/context/spring-context-3.0.xsd"
>

   <bean id="eventNotificationBus" class="org.apache.cloudstack.mom.rabbitmq.RabbitMQEventBus">
      <property name="name" value="eventNotificationBus"/>
      <property name="server" value="127.0.0.1"/>
      <property name="port" value="5672"/>
      <property name="username" value="${username}"/>
      <property name="password" value="${password}"/>
      <property name="exchange" value="cloudstack-events"/>
   </bean>

   <bean id="environmentVariablesConfiguration" class="org.jasypt.encryption.pbe.config.EnvironmentStringPBEConfig">
      <property name="algorithm" value="PBEWithMD5AndDES" />
      <property name="passwordEnvName" value="APP_ENCRYPTION_PASSWORD" />
   </bean>

   <bean id="configurationEncryptor" class="org.jasypt.encryption.pbe.StandardPBEStringEncryptor">
      <property name="config" ref="environmentVariablesConfiguration" />
   </bean>

   <bean id="propertyConfigurer" class="org.jasypt.spring3.properties.EncryptablePropertyPlaceholderConfigurer">
      <constructor-arg ref="configurationEncryptor" />
      <property name="location" value="classpath:/cred.properties" />
   </bean>
</beans>
Create a new file in the same folder called
cred.propertiesand the specify the values for username and password as jascrypt encrypted stringsSample, with
guestas values for both fields:username=nh2XrM7jWHMG4VQK18iiBQ== password=nh2XrM7jWHMG4VQK18iiBQ==
Restart the Management Server.
CloudStack creates the exchange ‘cloudstack-events’ which will receive messages containing CloudStack events; however will be no queues created.
To create a queue and bind with cloudstack-events the following steps are needed:
Go to Queues tab and add a queue, e.g. ‘cloudstack-queue’
Go to Exchanges tab and Bind to queue cloudstack-queue with the desired ‘Routing key’.
Routing keys
The routing key is a list of words, delimited by a period (“.”). CloudStack builds routing keys according to each event type, some examples are:
Some example of routing keys that match CloudStack events: - A pound symbol (“#”) indicates a match on zero or more words; thus, it will match any possible set of words; - Asterisk (“*”) matching any word and the period (“.”) delimiting example ‘*.*.*.*.*’
Kafka Configuration
As a CloudStack administrator, perform the following one-time configuration to enable event notification framework. At run time no changes can control the behaviour.
Create an appropriate configuration file in
/etc/cloudstack/management/kafka.producer.propertieswhich contains valid kafka configuration properties as documented in http://kafka.apache.org/documentation.html#newproducerconfigs The properties may contain an additionaltopicproperty which if not provided will default tocloudstack. Whilekey.serializerandvalue.serializerare usually required for a producer to correctly start, they may be omitted and will default toorg.apache.kafka.common.serialization.StringSerializer. A sample example which will be used by cloudstack for exporting of eventscat /etc/cloudstack/management/kafka.producer.properties bootstrap.servers=<localhost>:9092 acks=all topic=cs retries=1
Create the folder
/etc/cloudstack/management/META-INF/cloudstack/eventInside that folder, open
spring-event-bus-context.xml.Define a bean named
eventNotificationBuswith a singlenameattribute, A sample bean is given below:<beans xmlns="http://www.springframework.org/schema/beans" xmlns:xsi="http://www.w3.org/2001/XMLSchema-instance" xmlns:context="http://www.springframework.org/schema/context" xmlns:aop="http://www.springframework.org/schema/aop" xsi:schemaLocation="http://www.springframework.org/schema/beans http://www.springframework.org/schema/beans/spring-beans-3.0.xsd http://www.springframework.org/schema/aop http://www.springframework.org/schema/aop/spring-aop-3.0.xsd http://www.springframework.org/schema/context http://www.springframework.org/schema/context/spring-context-3.0.xsd"> <bean id="eventNotificationBus" class="org.apache.cloudstack.mom.kafka.KafkaEventBus"> <property name="name" value="eventNotificationBus"/> </bean> </beans>
Restart the Management Server.
Standard Events
The events log records three types of standard events.
INFO. This event is generated when an operation has been successfully performed.
WARN. This event is generated in the following circumstances.
When a network is disconnected while monitoring a Template download.
When a Template download is abandoned.
When an issue on the storage server causes the volumes to fail over to the mirror storage server.
ERROR. This event is generated when an operation has not been successfully performed
Long Running Job Events
The events log records three types of standard events.
INFO. This event is generated when an operation has been successfully performed.
WARN. This event is generated in the following circumstances.
When a network is disconnected while monitoring a Template download.
When a Template download is abandoned.
When an issue on the storage server causes the volumes to fail over to the mirror storage server.
ERROR. This event is generated when an operation has not been successfully performed
Event Log Queries
Database logs can be queried from the user interface. The list of events captured by the system includes:
Instance creation, deletion, and on-going management operations
Virtual router creation, deletion, and on-going management operations
Template creation and deletion
Network/load balancer rules creation and deletion
Storage volume creation and deletion
User login and logout
Deleting and Archiving Events and Alerts
CloudStack provides you the ability to delete or archive the existing alerts and events that you no longer want to implement. You can regularly delete or archive any alerts or events that you cannot, or do not want to resolve from the database.
You can delete or archive individual alerts or events either directly by using the Quickview or by using the Details page. If you want to delete multiple alerts or events at the same time, you can use the respective context menu. You can delete alerts or events by category for a time period. For example, you can select categories such as USER.LOGOUT, VM.DESTROY, VM.AG.UPDATE, CONFIGURATION.VALUE.EDI, and so on. You can also view the number of events or alerts archived or deleted.
In order to support the delete or archive alerts, the following global parameters have been added:
alert.purge.delay: The alerts older than specified number of days are purged. Set the value to 0 to never purge alerts automatically.
alert.purge.interval: The interval in seconds to wait before running the alert purge thread. The default is 86400 seconds (one day).
Note
Archived alerts or events cannot be viewed in the UI or by using the API. They are maintained in the database for auditing or compliance purposes.
Permissions
Consider the following:
The root admin can delete or archive one or multiple alerts or events.
The domain admin or end user can delete or archive one or multiple events.
Procedure
Log in as administrator to the CloudStack UI.
In the left navigation, click Events.
Perform either of the following:
To archive events, click Archive Events, and specify event type and date.
To archive events, click Delete Events, and specify event type and date.
Click OK.
Webhooks
Webhooks allow external services to be notified when certain events happen. CloudStack allows provisioning webhooks for all account roles and for various scopes. This allows users to consume event notifications without any external services such as an event streaming platforms.
Webhooks can be managed using both API and UI. CloudStack provides following APIs for webhooks:
API
Description
createWebhook
Creates a Webhook
listWebhooks
Lists Webhooks
updateWebhook
Updates a Webhook
deleteWebhook
Deletes a Webhook
listWebhookDeliveries
Lists Webhook deliveries
deleteWebhookDelivery
Deletes Webhook delivery(s)
executeWebhookDelivery
Executes a Webhook delivery
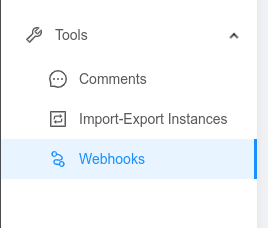
In the UI, webhooks can be managed under Tools > Webhooks menu.
Creating a webhook
Any CloudStack user having createWebhook API access can create a new webhook for the event notifications.
To create a webhook:
Log in to the CloudStack UI.
In the left navigation bar, click Tools and choose Webhooks.
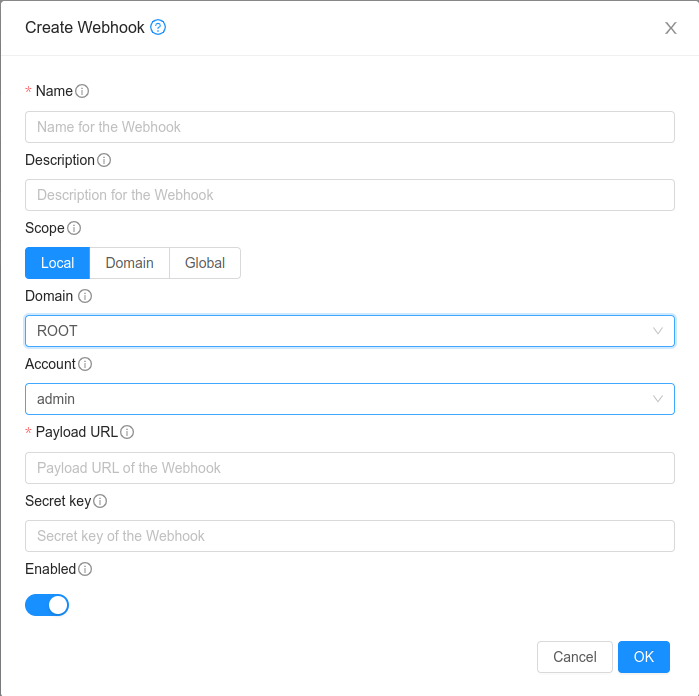
Click Create Webhook.
In the dialog, make the following choices:
Name. Any desired name for the webhook.
Description. A short description of the webhook.
Scope. (Available only for ROOT admins or domain admins). Scope of the webhook. The value can be Local, Domain or Global. Local - only events associated with the owner account will be notified. Domain - events associated with domain will be notified. Global - all events will be notified. This is available only for ROOT admin account. For a normal user account, webhooks can be created with Local scope only.
Domain. An optional domain for the Webhook. If the account parameter is used, domain must also be used.
Account. An optional account for the webhook. Must be used with domain.
Payload URL. The payload URL of the Webhook. All events for the webhook will posted on this URL.
SSL Verification. An optional parameter to specify whether the HTTP POST requests for event notifications must be sent with strict SSL verification request when a HTTPS payload URL is used.
Secret Key. An option secret key parameter which can be used to sign the HTTP POST requests for event notifications with HMAC.
Enabled. To specify whether the webhook be created with enabled or disabled state
Working with webhook deliveries
CloudStack attempts webhook deliveries using a thread pool with given retries. The following global configuration can be used to configure thread pool size for deliveries:
webhook.delivery.thread.pool.size: Size of the thread pool for webhook deliveries.
Also, the number attempts for a particular event notification and the timeout for one particular attempt can be configured using the following domain-level configurations:
webhook.delivery.retries: Number of tries to be made for a webhook delivery.
webhook.delivery.timeout: Wait timeout (in seconds) for a webhook delivery attempt.
Note
The onus of dealing with the duplicate event deliveries lies with the payload server or application. During delivery, when the server doesn’t respond in a timely manner or returns a failure CloudStack will re-attempt the delivery of the event, based on the above global settings, irrespective of the fact whether the server already received the event in any previous attempts.
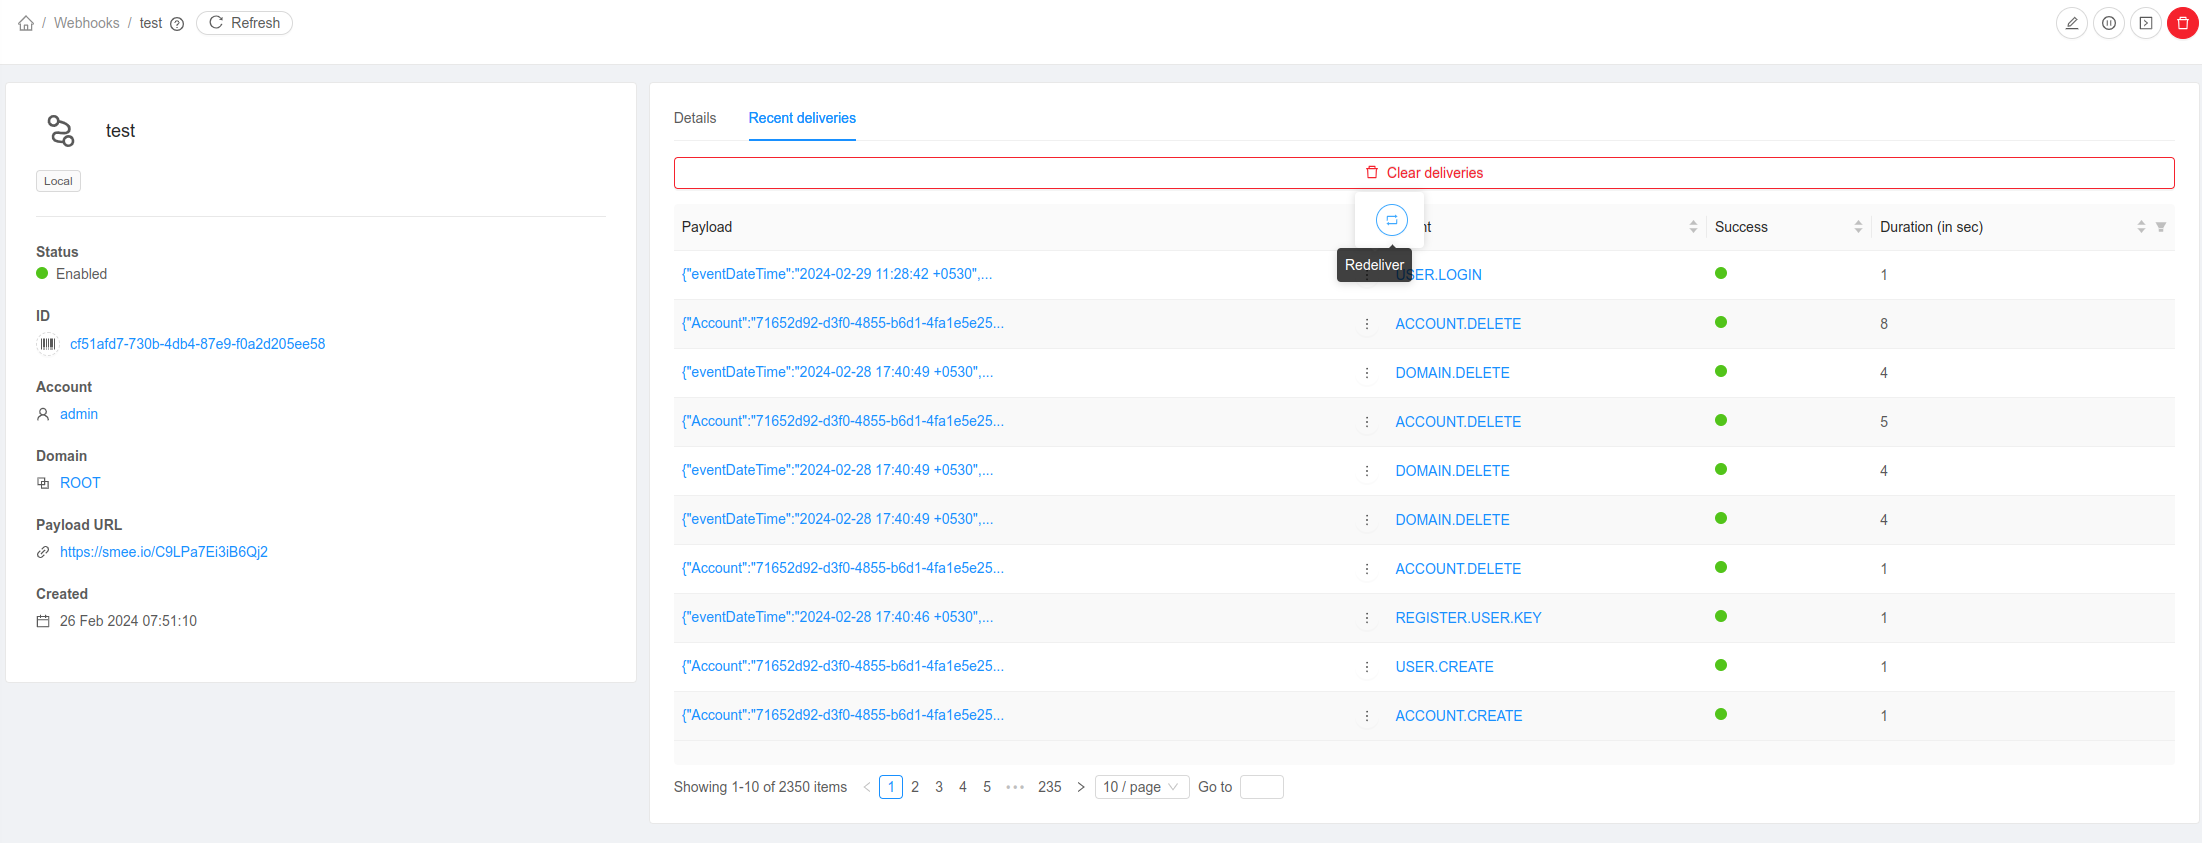
CloudStack allows retrieving recent deliveries for a webhook with details such as event, headers, payload, response, success, duration, etc. In the UI, these can be accessed under Recent deliveries tab in the Webhook detail view. The user can redeliver an existing delivery. To check the working of the webhook consumer test deliveries can made. Test deliveries are not recorded by CloudStack.
The administrator can configure storage of webhook deliveries using the following global configurations:
webhook.deliveries.limit: Limit for number of deliveries to keep in DB per webhook. Default value is 10.
webhook.deliveries.cleanup.interval: Interval (in seconds) for cleaning up webhook deliveries. Default value is 3600 or 1 hour.
webhook.deliveries.cleanup.initial.delay: Initial delay (in seconds) for webhook deliveries cleanup task. Default value is 180.
Based on the above configurations CloudStack will purge older deliveries in the database using a repeatedly running task.
For a webhook delivery, CloudStack sends a HTTP POST request with event data as the payload. The following custom headers are sent with the request:
X-CS-Event-ID. Event ID for which the webhook delivery is made.
X-CS-Event. Event for for which the webhook delivery is made.
User-Agent. In the format - CS-Hookshot/<ACCOUNT_ID>. Here ACCOUNT_ID is the ID of the account which triggered the event.
X-CS-Signature. HMAC SHA256 signature created using the webhook secret key and the delivery payload. It is sent only when secret key is specified for the webhook.
Working with HTTPS webhook payload URL with self-signed certificate
Generate a self signed certificate for the server, make sure to mention the IP address of the server when it prompts.
openssl req -x509 -newkey rsa:4096 -nodes -out cert.pem -keyout key.pem -days 365
Copy the generated cert.pem to the management server(s).
Import the certificate for JDK on the management server(s)
cp /etc/java/java-17-openjdk/java-17-openjdk-17.0.10.0.7-2.0.1.el8.x86_64/lib/security/cacerts /etc/java/java-17-openjdk/java-17-openjdk-17.0.10.0.7-2.0.1.el8.x86_64/lib/security/jssecacerts

keytool -importcert -file /root/kiran/cert.pem -alias webhook -keystore /etc/java/java-17-openjdk/java-17-openjdk-17.0.10.0.7-2.0.1.el8.x86_64/lib/security/jssecacerts -storepass changeit
Test the webhook.
Resource Alerts
Resource alerts let you get told when a resource goes over (or under) a value you pick. For example, “CPU of this Instance is above 80%” or “this storage pool is more than 90% full”.
You create a rule. CloudStack checks the rule every minute. When the condition is true, an alert is fired. The alert is saved in the alert history and can be sent out by webhook, email and the event bus.
Rules can be set on:
Instances
Volumes
Hosts
Storage pools
A rule can watch one resource, or all resources of that type that the rule owner can see.
Instance and Volume rules only cover user Instances and their volumes. System VMs, virtual routers and their volumes are not included.
Resource alerts can be managed using both API and UI. CloudStack provides the following APIs:
API
Description
createResourceAlertRule
Creates a resource alert rule
listResourceAlertRules
Lists resource alert rules
updateResourceAlertRule
Updates a resource alert rule
deleteResourceAlertRule
Deletes a resource alert rule
listResourceAlerts
Lists fired resource alerts
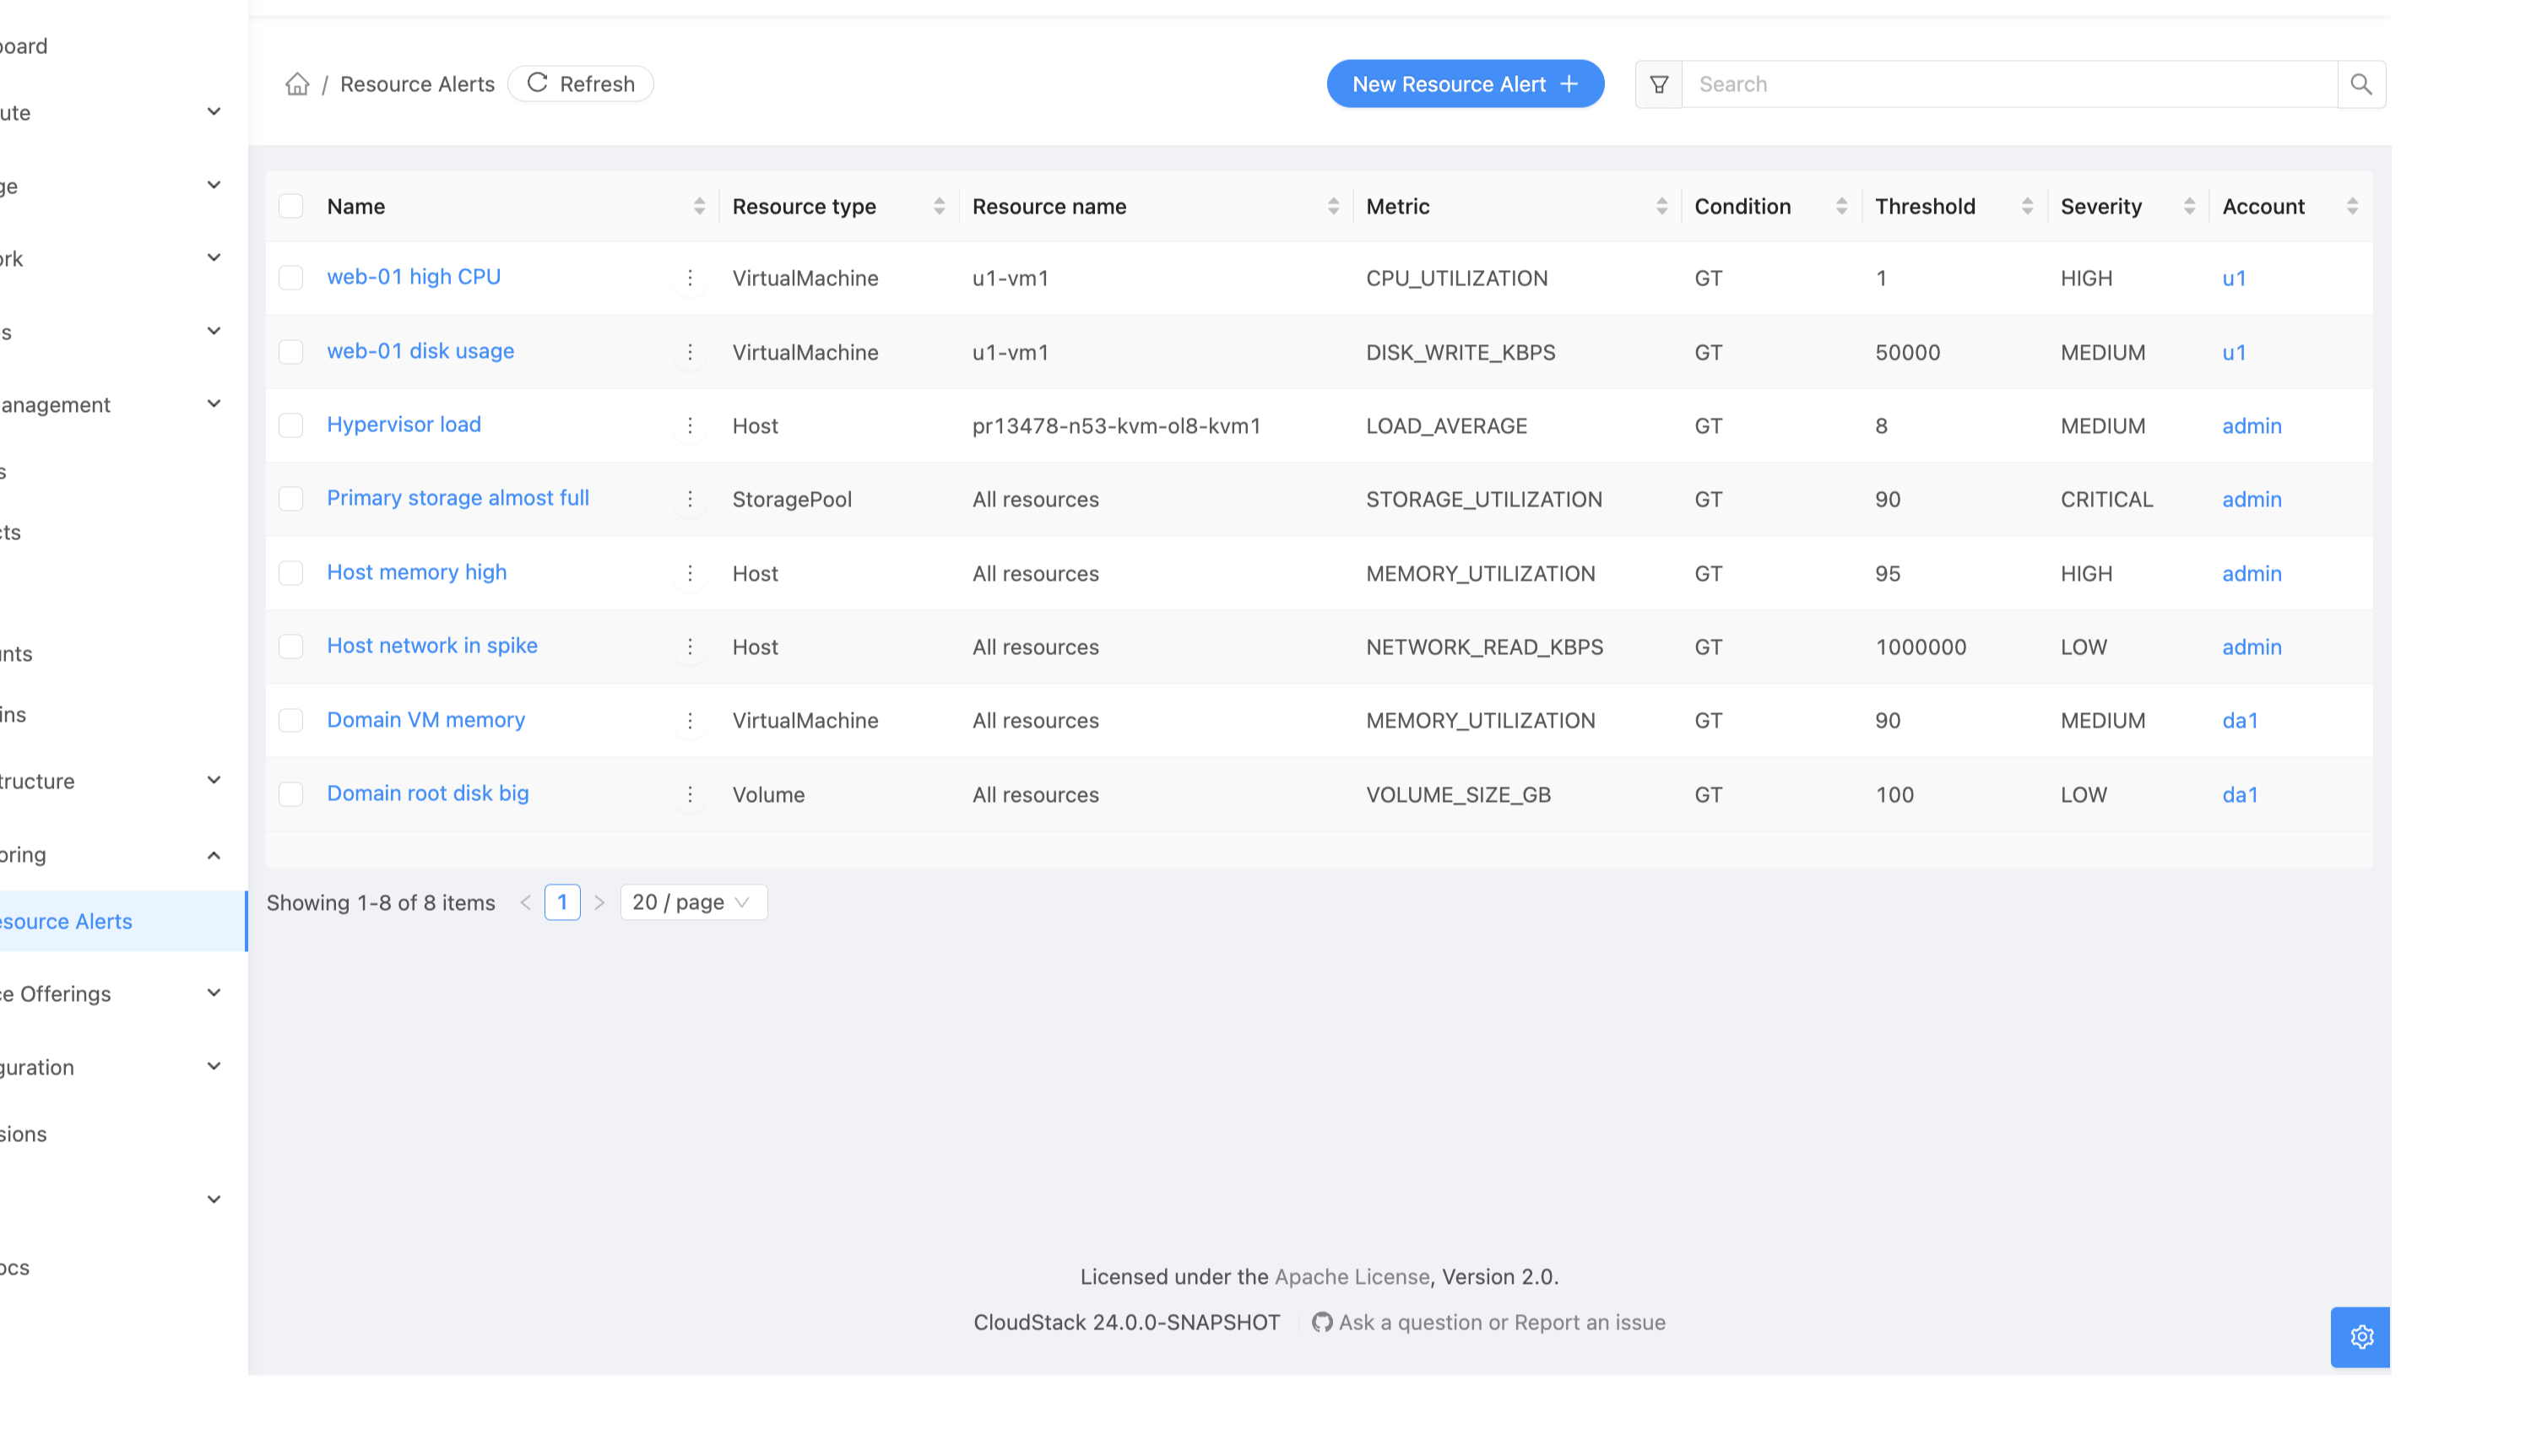
In the UI, rules are under Monitoring > Resource Alerts.
Who can create rules
Every account role can create rules, but each one only sees and manages its own.
User: rules on their own Instances and Volumes.
Domain Admin: rules on Instances and Volumes in their domain. A domain admin can also create a rule for another account in the domain.
Root Admin: rules on any resource, including Hosts and Storage pools. Only the root admin can turn on email for a rule.
A rule on “all resources” follows the same limits. For a user it covers only their own resources. For a domain admin it covers the domain. For the root admin it covers the whole cloud.
Users and domain admins cannot see or change rules that belong to someone else.
Creating a rule
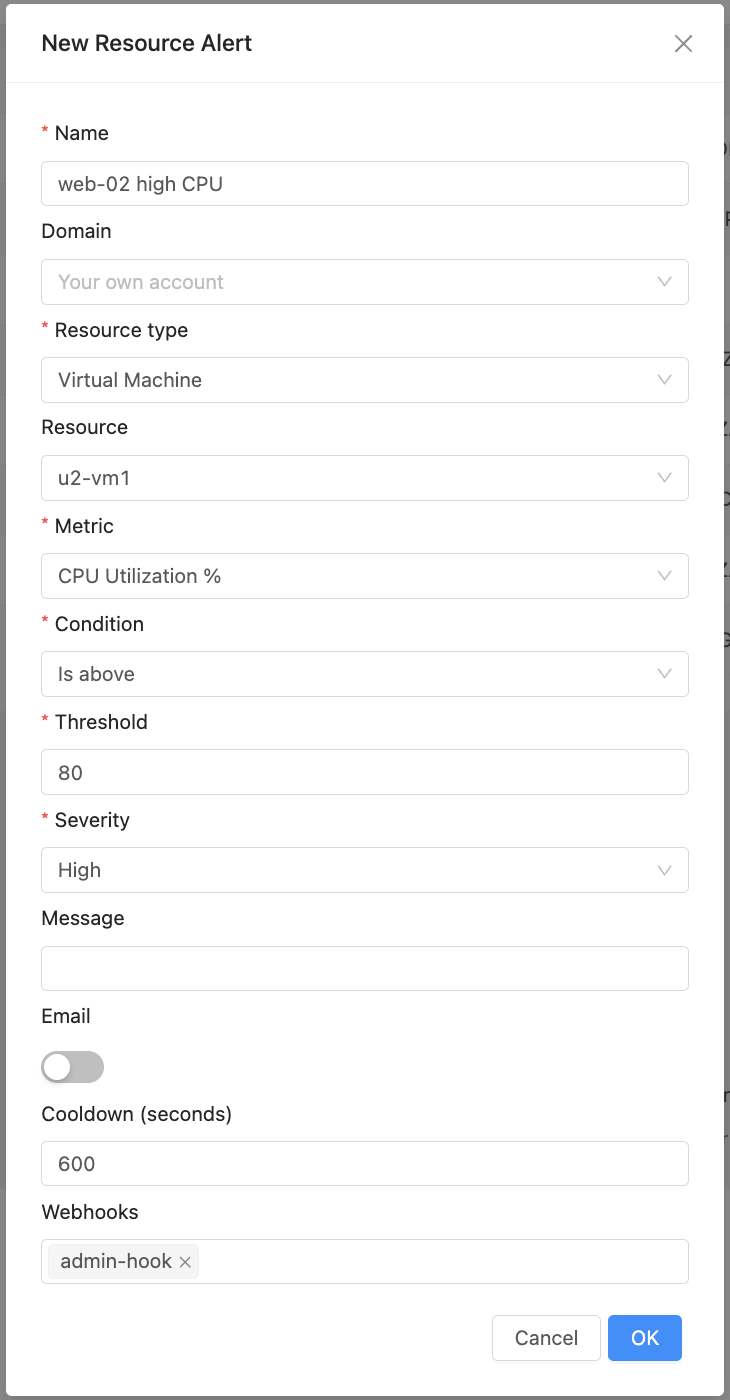
Go to Monitoring > Resource Alerts and click New Resource Alert.
Fill in the form:
Name: a name for the rule.
Domain and Account: shown to admins. Pick them to create the rule for another account. Leave empty to create it for yourself.
Resource type: Virtual Machine, Volume, Host or Storage Pool.
Resource: one resource, or All resources.
Metric: what to watch. The list depends on the resource type.
Condition and Threshold: for example Is above and 80.
Severity: Critical, High, Medium or Low.
Message: optional text that is added to the alert.
Email: root admin only. Also send the alert by email.
Cooldown (seconds): how long to wait before the same rule alerts again for the same resource. Leave empty to use
resourcealert.repeat.interval.default.Webhooks: optional. Webhooks the alert is sent to. Only webhooks the rule owner can use are listed.
Click OK.
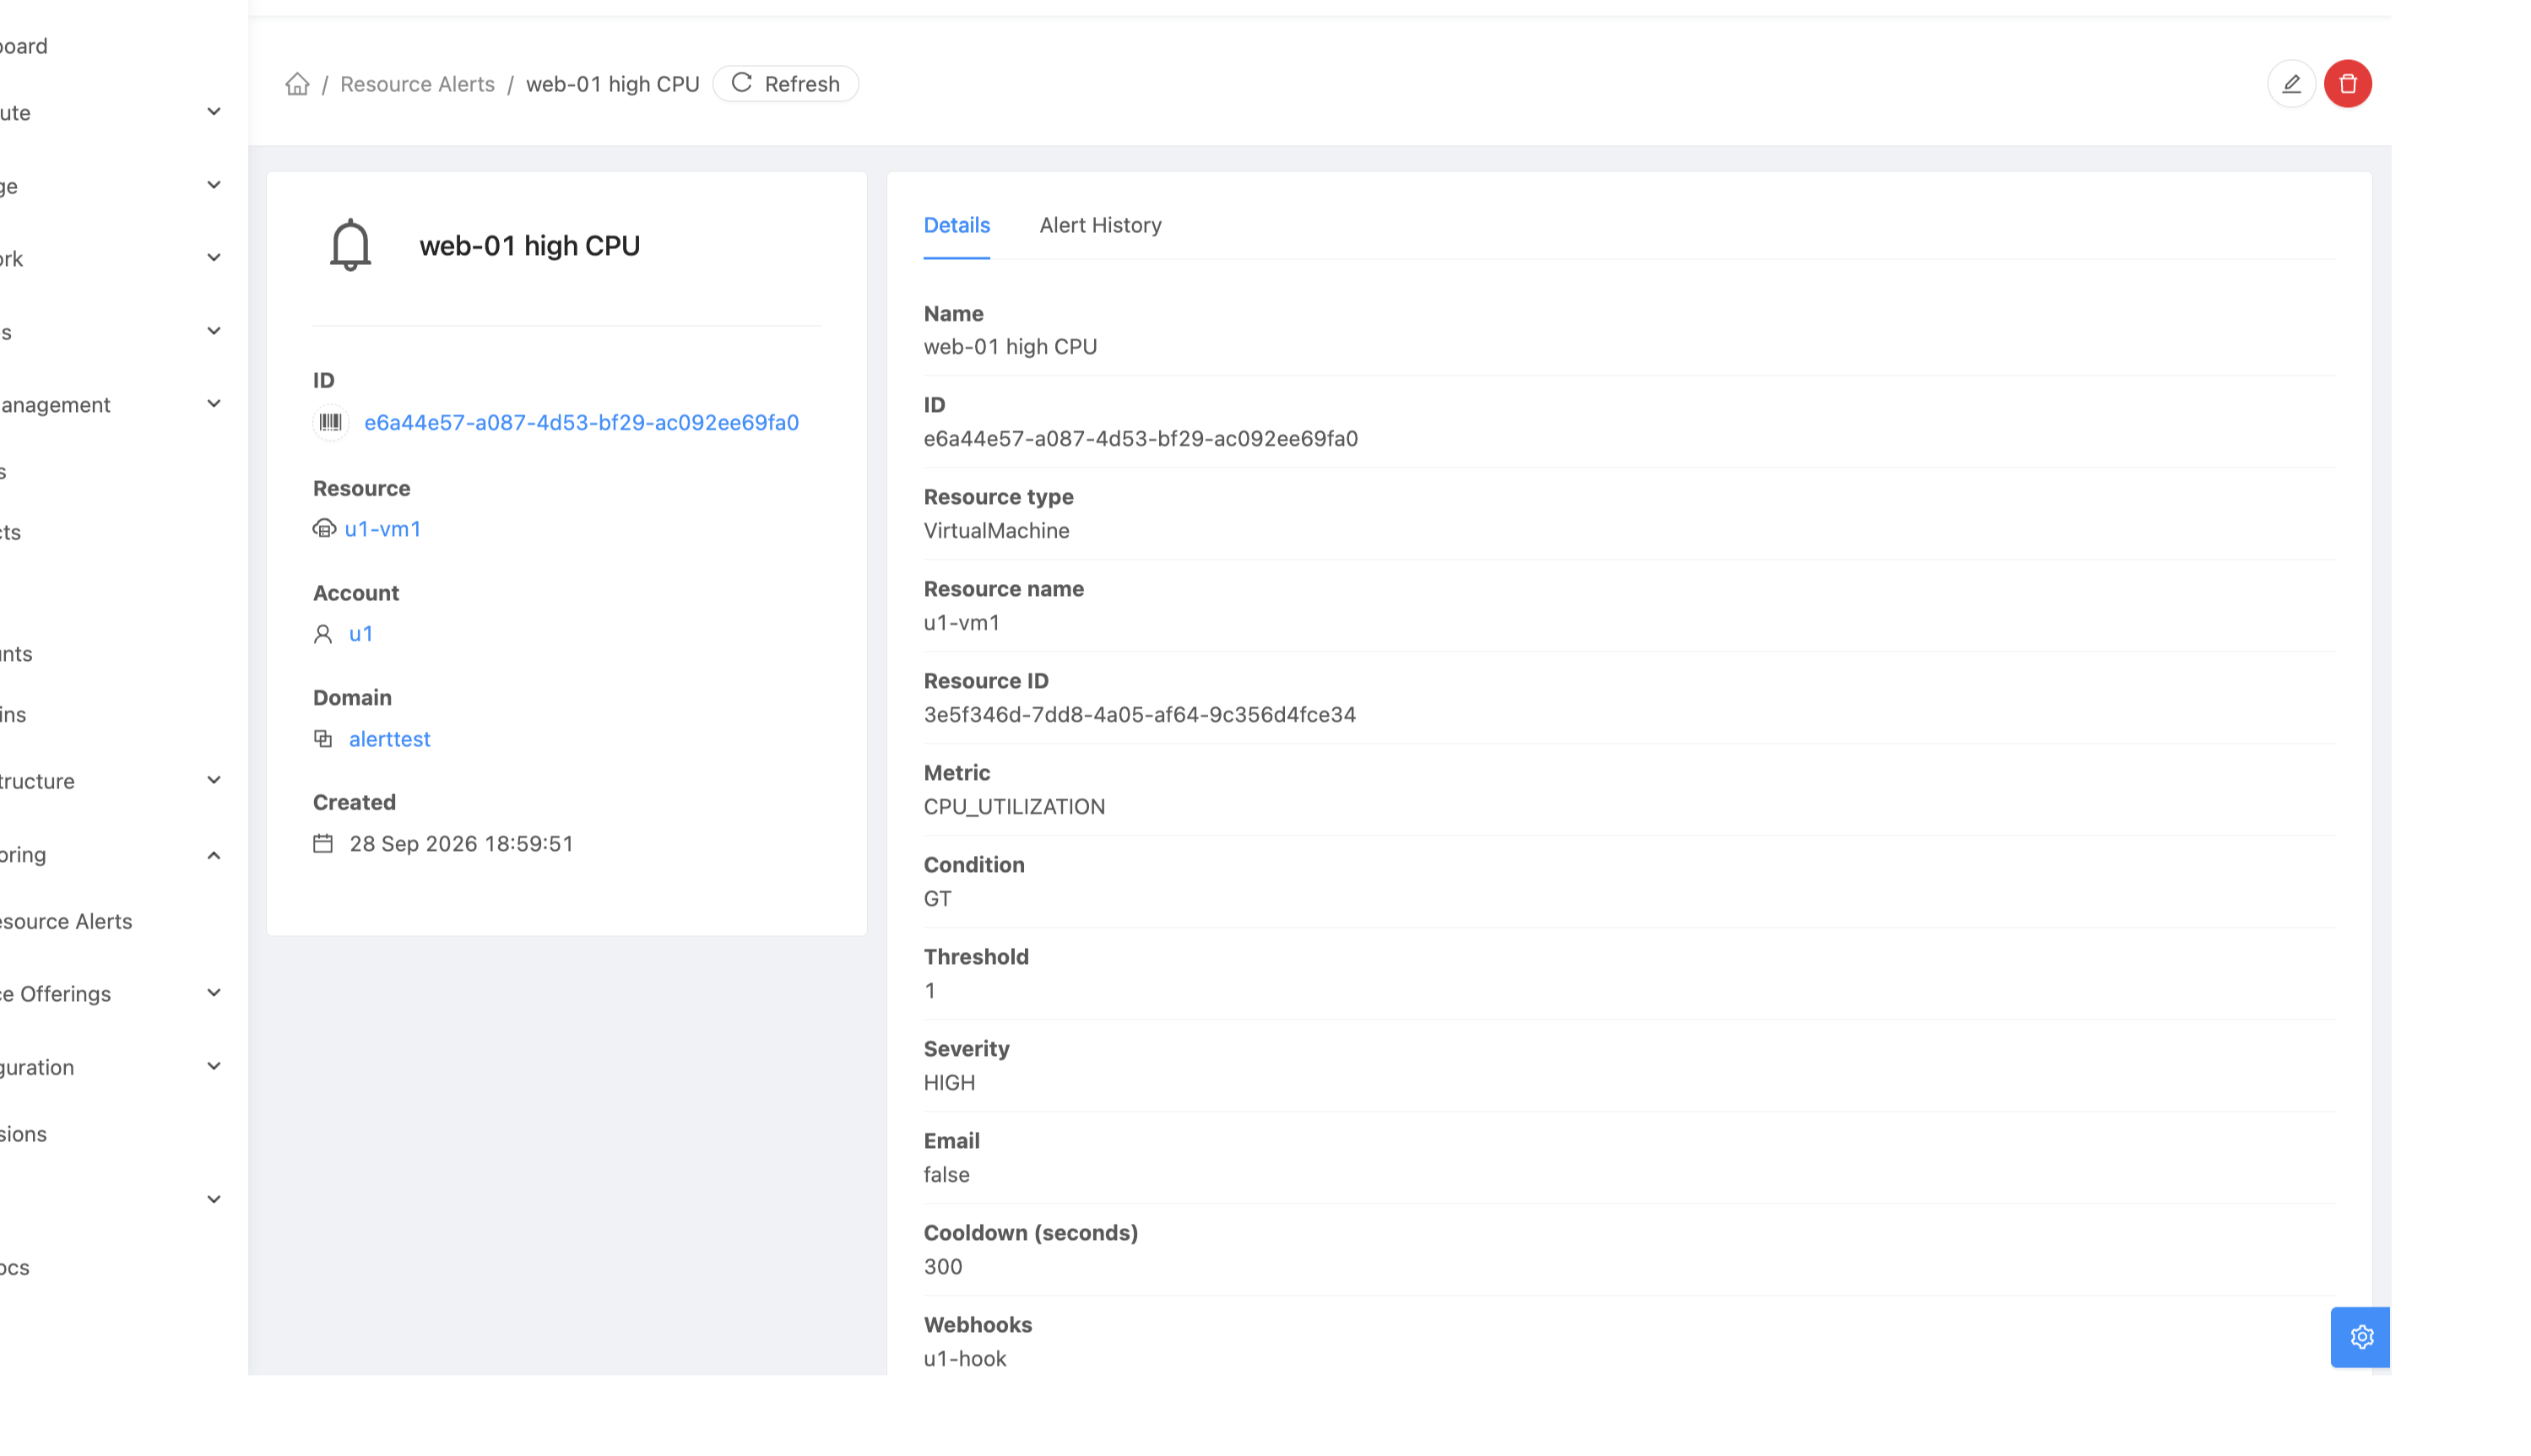
The rule details page shows the rule and the webhooks it sends to. It can be edited, disabled or deleted from there.
A disabled rule is not checked and fires no alerts, but it keeps its alert history. Enable it again to start checking. This is useful during planned maintenance. A disabled rule on one resource does not stop your All resources rule for that resource.
Metrics
Resource type
Metrics
Virtual Machine
CPU Utilization %, Memory Utilization %, Disk Read IOPS, Disk Write IOPS, Disk Read KB/s, Disk Write KB/s, Network In KB/s, Network Out KB/s
Volume
Volume Used (GB), Volume Used %
Host
CPU Utilization %, Memory Utilization %, Load Average, Network In KB/s, Network Out KB/s
Storage Pool
Storage Utilization %, Storage Used IOPS
Values come from the stats CloudStack already collects. If a resource does not report a metric, the rule is skipped for it and no alert is fired. For example, NFS storage pools do not report IOPS, and Instance memory needs the guest to report it.
Volume Used is the space the volume takes on the storage, not its disk size. Volume Used % is that space out of the disk size.
Disk metrics are only on Instances. CloudStack does not collect disk reads and writes per volume by default, so a rule on a Volume cannot use them.
For metrics that are a percentage, the threshold cannot be more than 100.
How alerts are fired
Rules are checked every
resourcealert.evaluation.intervalseconds.When a rule’s condition is true, an alert is fired. After that, the same rule does not alert again for the same resource until the cooldown is over. The check still runs every interval, the cooldown only controls how often an alert goes out.
With more than one management server, only one of them checks the rules. Alerts are not doubled.
If you have a rule on one resource for a metric, your All resources rule for the same metric skips that resource. Rules of other accounts are not affected.
To keep a resource out of All resources rules, add the tag
resource.alert.opt.outwith the valuetrueto it. Rules on that one resource still work.When a resource or an account is removed, its rules are removed too.
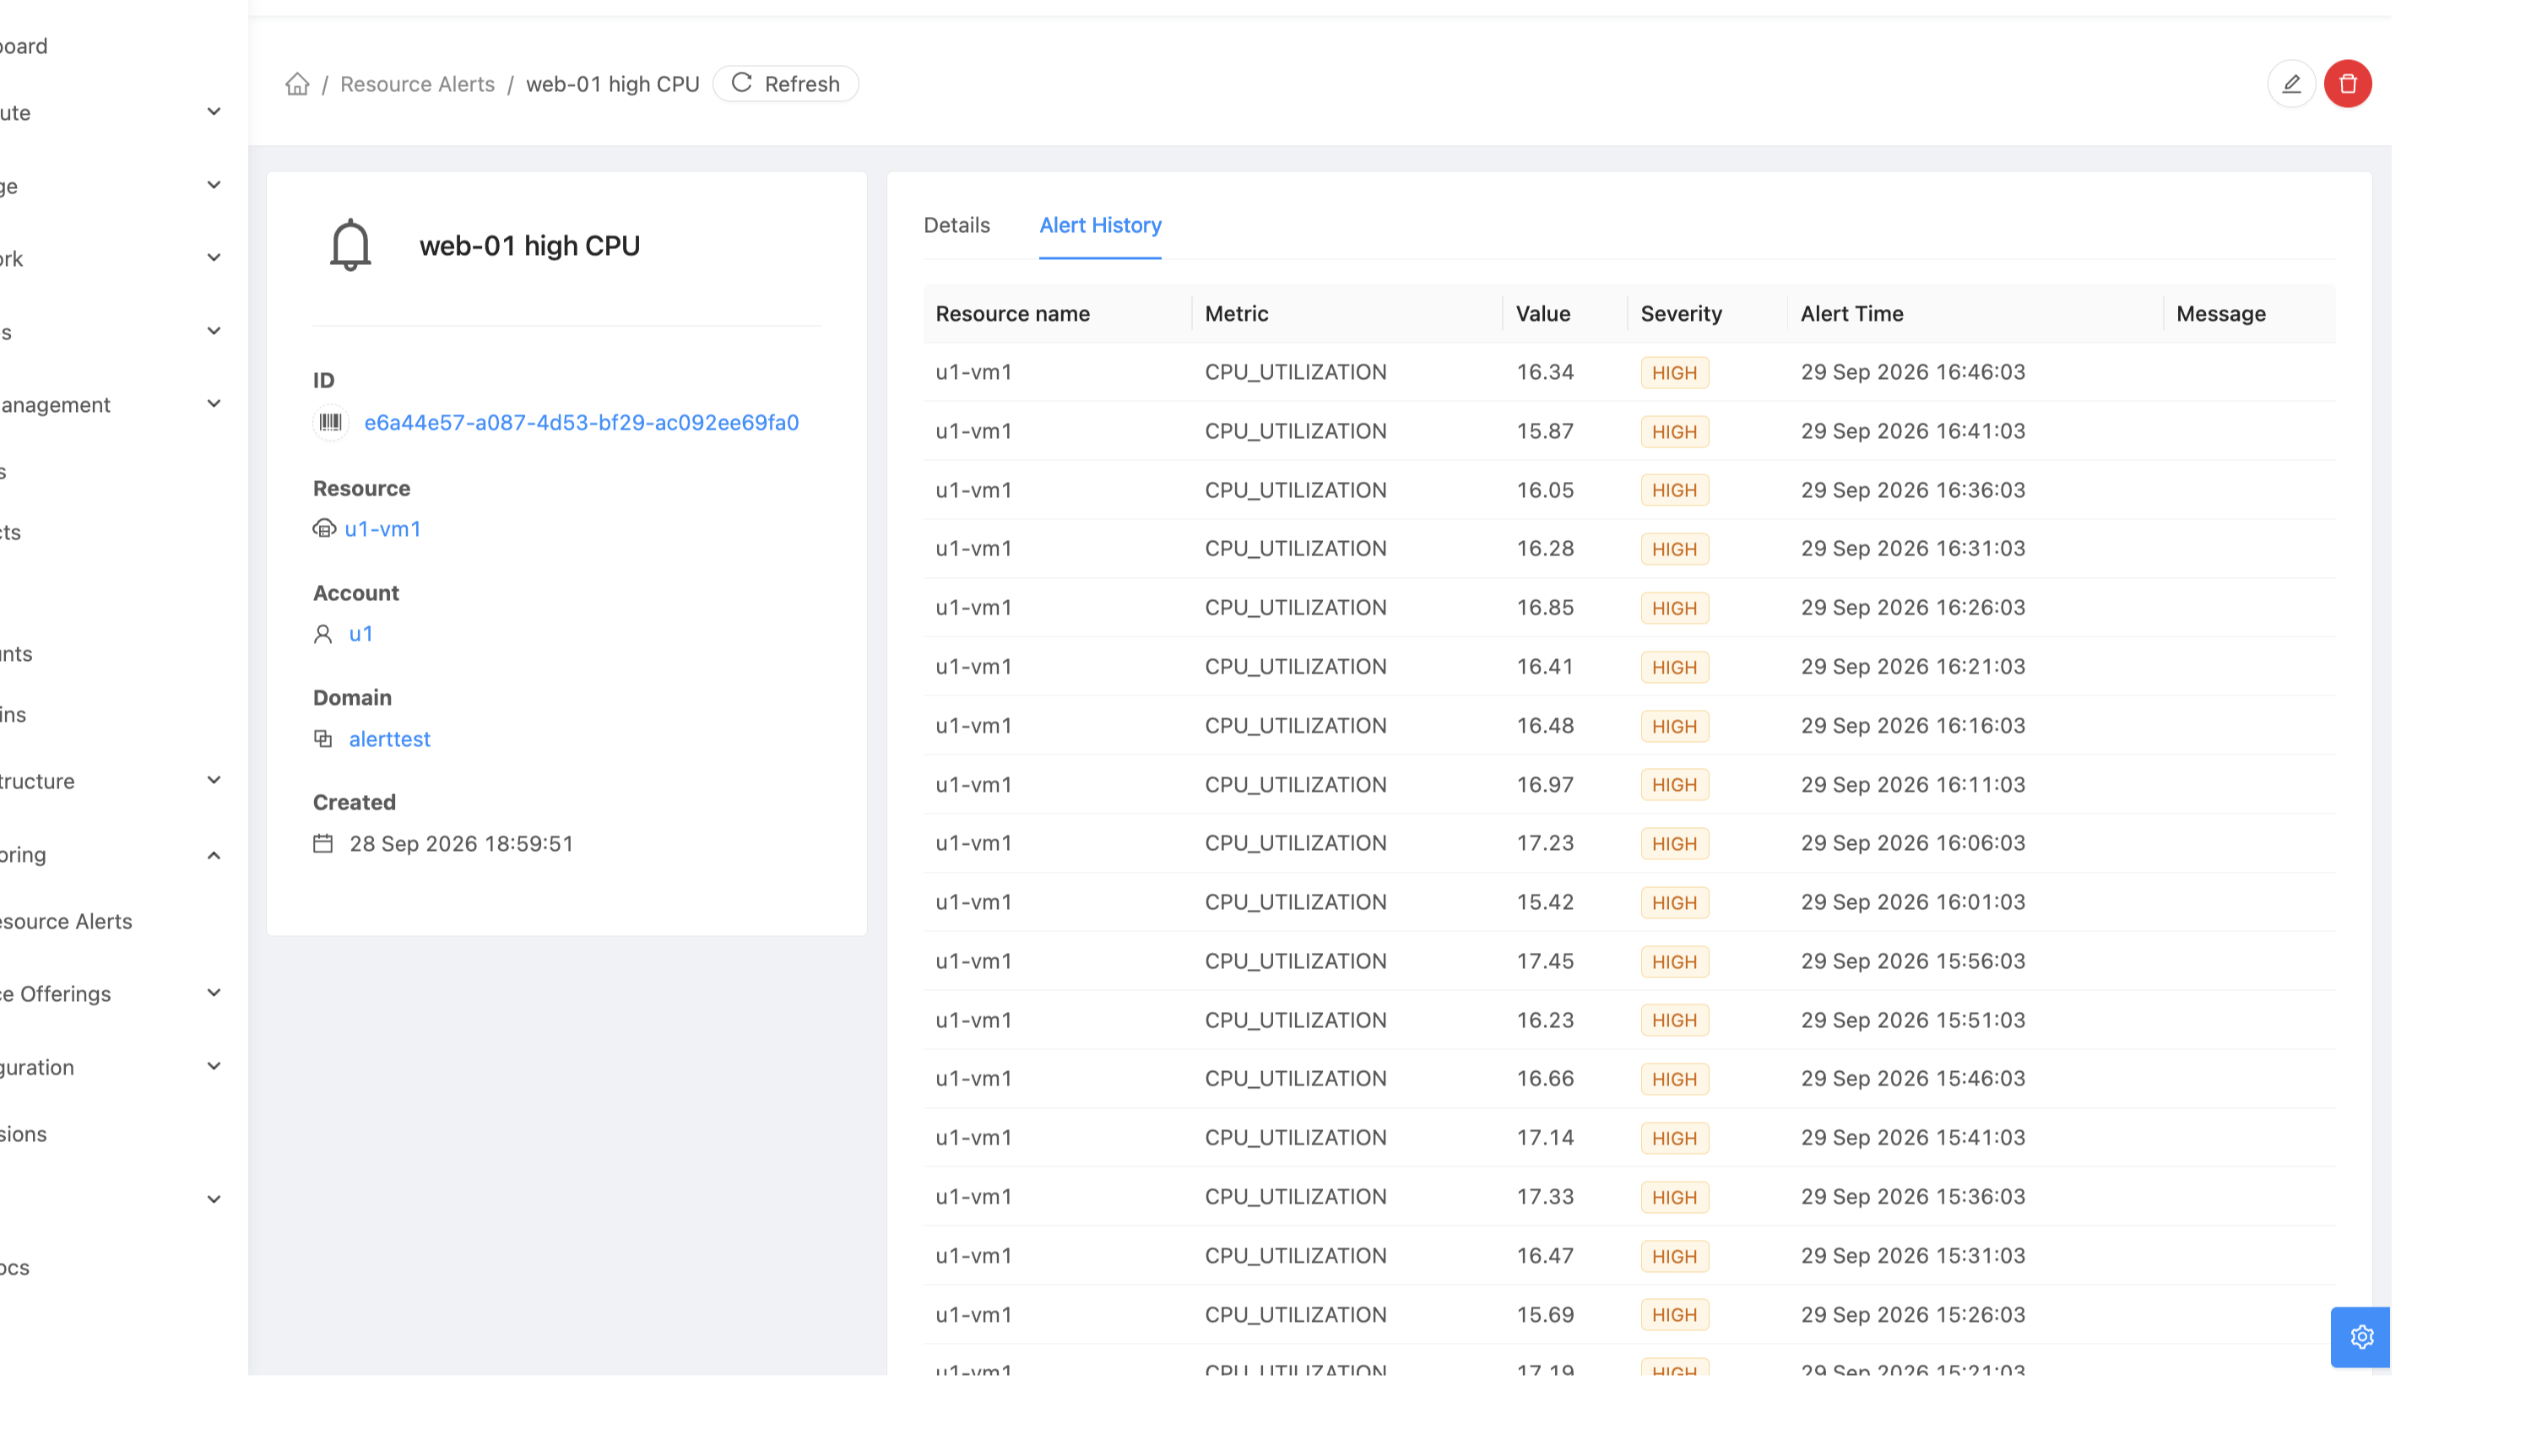
Alert history
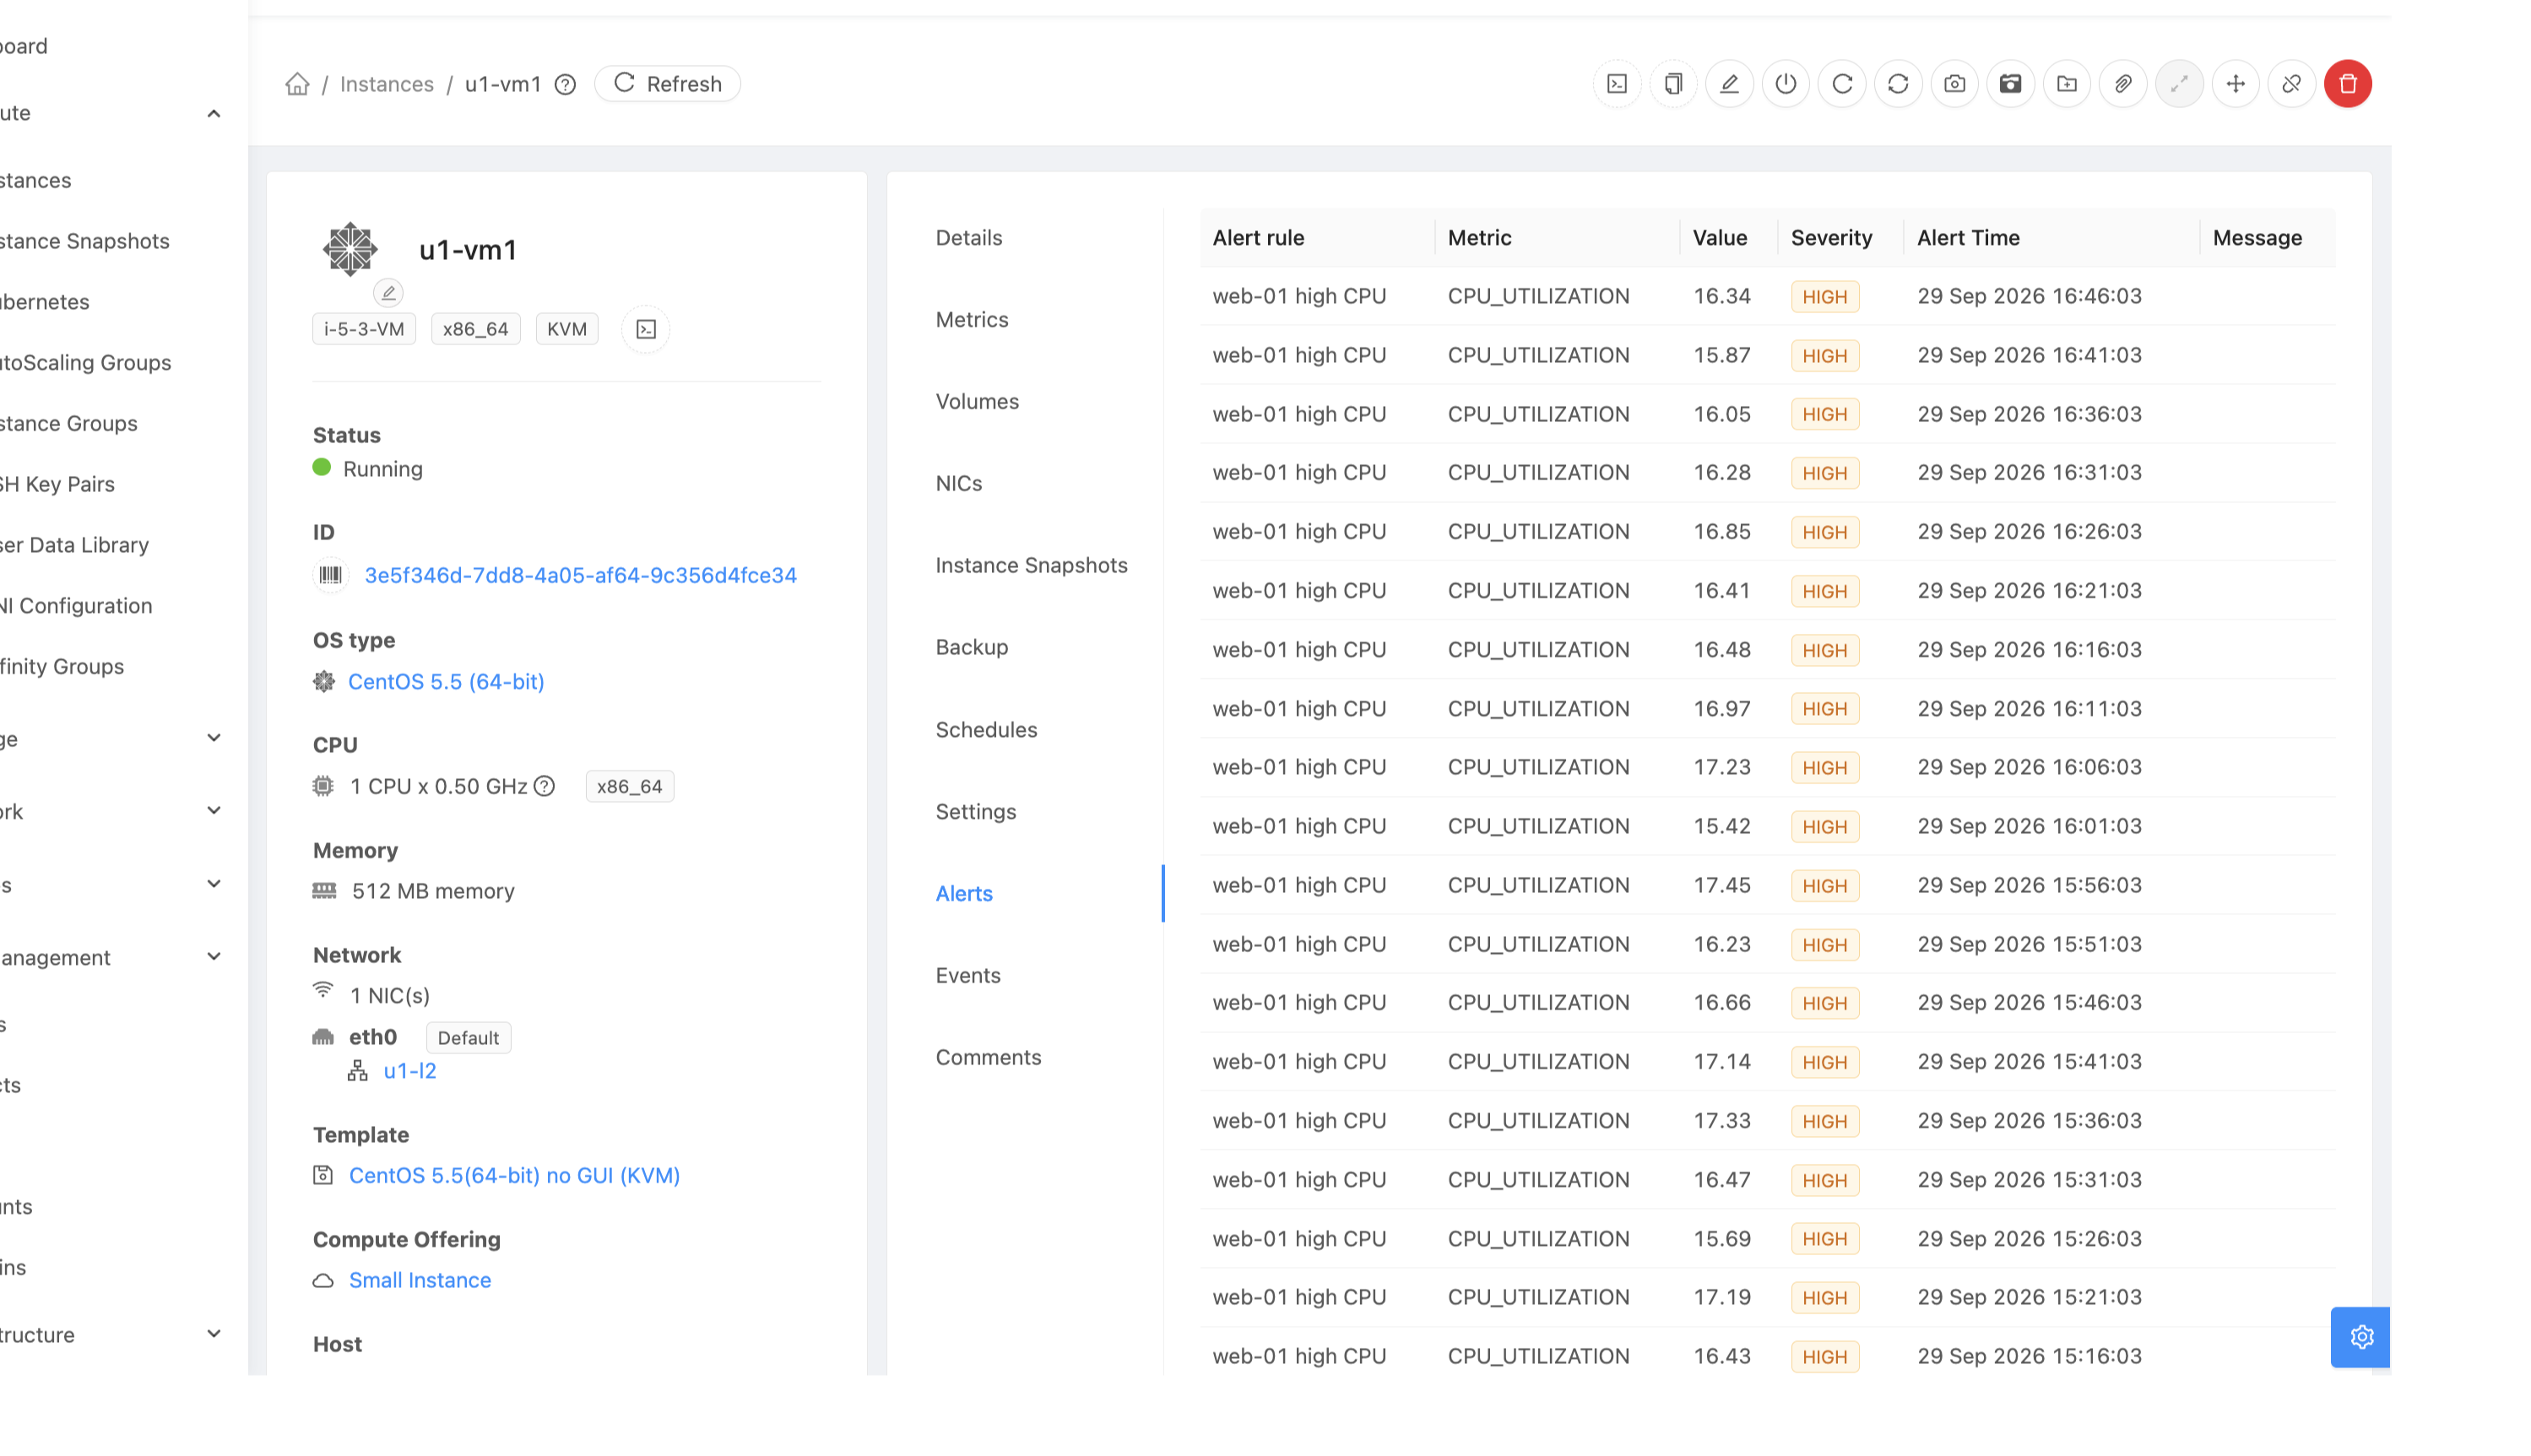
Fired alerts can be seen in two places:
The Alert History tab of a rule.
The Alerts tab on the Instance, Volume, Host or Storage pool page. It lists the alerts for that resource from the rules you can see.
Old alerts are removed after resourcealert.history.retention.days
days. Deleting a rule also deletes its alert history.
Where alerts are sent
Every alert is saved in the alert history. It can also be sent to:
Webhooks: to the webhooks picked on the rule. The payload is JSON with the rule, the resource, the metric, the value, the threshold and the severity. The event type is
RESOURCE.ALERT, so webhook filters can include or exclude it. The deliveries show in the webhook’s Recent deliveries tab and can be sent again from there. See the Webhooks section above for setting up webhooks.Example payload:
{
  "event": "RESOURCE.ALERT",
  "id": "2695b7b3-7500-4a0f-93ab-dae8b405cae2",
  "ruleid": "e6a44e57-a087-4d53-bf29-ac092ee69fa0",
  "rulename": "web-01 high CPU",
  "resourcetype": "VirtualMachine",
  "resourceid": "3e5f346d-7dd8-4a05-af64-9c356d4fce34",
  "resourcename": "web-01",
  "metric": "CPU_UTILIZATION",
  "condition": "GT",
  "threshold": 80.0,
  "value": 86.9,
  "severity": "HIGH",
  "message": null,
  "timestamp": "2026-09-29T16:11:03.940Z"
}
Email: when Email is on for the rule. The email goes to the addresses in
alert.email.addressesand uses the same mail server settings as other CloudStack alerts (alert.smtp.host,alert.smtp.portand so on).Event bus: every alert is published as an alert event with type
RESOURCE.ALERT, when an event bus such as RabbitMQ or Kafka is set up. See the Notification section above for setting up the event bus.
Creating, updating and deleting rules also creates the events
RESOURCE.ALERT.RULE.CREATE, RESOURCE.ALERT.RULE.UPDATE and
RESOURCE.ALERT.RULE.DELETE.
Settings
Setting
Default
Description
resourcealert.evaluation.interval
60
Seconds between rule checks. Needs a management server restart.
resourcealert.repeat.interval.default
600
Cooldown in seconds for rules that don’t set one.
resourcealert.history.retention.days
30
Days to keep fired alerts. 0 keeps them forever.
resourcealert.per.user.limit
20
Most rules an account can own, admin accounts included. 0 is unlimited. Can be set per account.